This post may contain affiliate links. If you use these links to buy something we earn a commission at no extra cost to you. Powerful Mothering is supported by its audience, thankyou!
This post is shared by Lizelle Rademeyer, visit her Facebook page and Blog. (Afrikaans)
Dedicated to Aunt Anne.
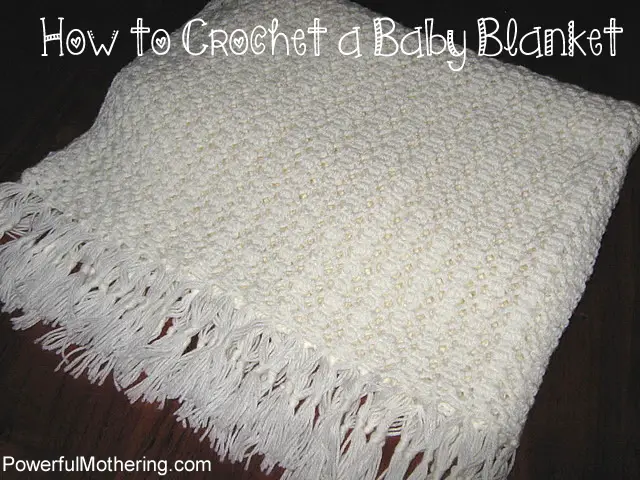
My aunt made this blanket for me for a special occasion when I was just a little baby. She still made a baby blanket for our eldest son as well. What makes this blanket even more special is that she had a stroke a couple of years back and will never be able to make another crochet blanket. I decided to work out the pattern and made a second one. Now each of my little girls can one day have one.

I used about 300g 4 ply baby wool and a 3mm crochet hook. The blanket is approximately 75cm x 90cm (without the tassels) .
Stitches needed:
ch – chain
dc – double crochet (US) or treble (UK)
sc – single crochet (US) of double crochet (UK)
4dc-tog – Start with a dc, but only yarn through the first 2 stitches (leave 2 on the hook), continue making 3 more dc’s in this way. You are now left with 5 stitches on the hook. Pull the yarn through all 5.

Pattern:
1) 192 ch
2) sc in each ch
3) 1 ch , 1sc, *3ch, skip next 2 sc, sc in next sc * (repeat * to* until there is only 2 remaining sc, sc in last 2 sc

4) 3 ch, dc, *3 ch, sc in first 3 ch space, 3 ch, 4dc-tog in next 3 ch space * (repeat * to * until 2nd last 3 ks space), 3 ch, sc in last 3ch space, 3ch, dc in last 2 sc

5) 1 ch, 1 sc, 3 ch, skip first 3 ch space, sc in next 3 ch space, * 3 ch, sc in 3 ch space* (repeat * to * until 2nd last 3 ch space), 3 ch, skip last 3 ch space, sc in last 2 dc’s

repeat row 4 and 5 (ending with row 5) until you have the desired length .
Finish with sc’s around entire blanket (3 sc in each 3 ch space and 2sc in each dc side).

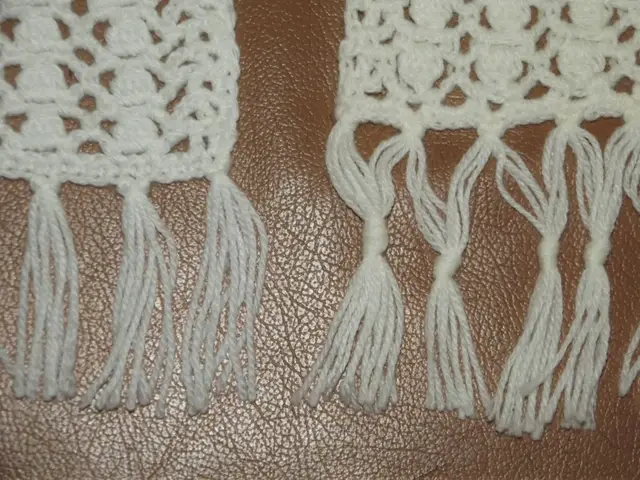
There is 2 easy ways to add fringing to the blanket. I usually prefer to rather start out with a too long fringe and then cut it to the length that I prefer. For the simple fringe on the left I’ve cut approximately 12 cm pieces of yarn, 4 pieces per tassel. Then added a tassel to every 5th sc.
For the fringe on the right I’ve simply used longer pieces of yarn (about 20cm). Each tassel is then divided into 2 pieces and knotted midway.
You can obviously add more pieces of yarn for thicker tassels or decrease the 5 sc spacing.
Once you are finished simply cut all the tassels to the same length for a even fringe.


Samantha says
Firstly thank you so much for posting this pattern, I started it a year ago for my baby nephew but kept putting it down, I just loved the story behind this blanket.
I am about to sc all the way around the blanket but I’m not sure I really understand, it says 3sc in each and 2sc in each dc side… I’ve started going down the sides of the blanket with 3sc in each ch3 space, I can’t seem to see where the the dc side is where I put 2sc, does that make sense? sorry I know this may sound silly but I just don’t want it to go wrong…I will really appreciate any further information.
Thank you
Samantha.
Lizelle Rademeyer says
Hi Samantha,
I’m glad you’re enjoying the project.
On the side you started and on the opposite side (the one you finished on) you’ll need 3sc in each of the the 3ch spaces. The 2 remaining sides are made of the sides of dc stitches. In each of these you’ll need 2sc to create a smooth edge.
I’m not sure if that makes more sense? Shout if it does!
Ruth says
Just found this so you may not see my question but I’m elderly so don’t have the best vision. Therefore I was wondering if you want to make this a different size, what multiples should I use for the chain…such as mult of 3+1… something on that order. Since I’m going to use a larger hook it will come out too large unless I revise it and use a lower chain count.
mary says
thank for this beautiful blanket and sharing the story behind it
Kathleen says
Trying out your lovely blanket and have a query. In row 4 what does KS spaces stand for ?
Thank you.
Lizelle Rademeyer says
Brilliant of you to pick up on that. It was suppose to be ch space. Sorry about that. It’s a little gremlin that crept in during the translation.
Hoping you’ll enjoy this project.
Sassy says
Hi, this is beautiful. In the pic of your completed one, can your telme, did out put a lining on the back or did you pull ribbon through? I love the contrast with the pearlized shimmer with the yarn stitches and wish to replicate something similar. Thanks so much. It’s absolutely gorgeous!
Lizelle Rademeyer says
Thank you. No, I didn’t put a lining or ribbon on. The pearly effect is simply the layers underneath, because it is folded. Due to it having a lot of holes, I’m sure you would be able to add some ribbon around the edge. Unfortunately I’ve never tried lining a crochet blanket, so I have no clue how well that would work.
emine says
Türkiye’den yazıyorum. Güzel bir battaniye. Örene, fotoğraf ve talimat hazırlayana teşekkür ederim
e.t.
Nibit says
This pattern will make a beautiful scarf! Not sure I’d use as a baby blanket with all the holes, but a beautiful keepsake for sure. Years ago I made and gave blankets like this as gifts, and later was told by parents their babies fingers and toes got caught in the holes. Never gave it much thought at the time.
Christine says
Hi, thanks for the lovely pattern but unfortunately I cannot copy/paste the pictures. Pattern comes through ok though.
Nicolette Roux says
If you have a look at the top of the post there are a bunch of sharing buttons for facebook / twitter / pinterest etc.. the 2nd last one is light blue with a printer on it. If you click on that one it will generate a printable pattern for you and include the images. 😀
Mary R. says
Beautiful pattern. I will be trying this one! Thanks for the tutorial:)
Beth watson says
I’m sorry but I don’t seem to be able to find what amount of materials are needed for this blanket?
Nicolette Roux says
300g 4 ply baby wool and a 3mm crochet hook.
Is this what you need?
Helen says
Hi,
I just crocheted this blanket, it is so easy. I am delighted with how it turned out and only have the fringing to do to complete it. Can you advise on length of fringe and how to knot it together. I can see how it is going through the knit but can’t work out the connecting ties. I have never done anything like this before. Thank you for instructions
Nicolette Roux says
Please see the updated details in the post 😀
Good luck!
Donna M says
This is so very pretty! Do you have a video tutorial?? I will love to watch and make this blanket.
Nicolette Roux says
Thank you! Unfortunately there is no video.
Natasha says
thanks for this tutorial, pinned it
Natasha @ Serenity You